
How to Add Your Business to Yell (Step-by-Step Guide)
In this guide
If you run a local business in the UK, getting found online by potential customers is your top priority. While Google often takes the spotlight, one platform you absolutely cannot afford to ignore is Yell.
As the digital evolution of the iconic Yellow Pages, Yell.com remains one of the UK’s most trusted and heavily trafficked business directories. Creating a free Yell listing does more than just put your services in front of millions of monthly visitors—it also creates a powerful local citation. This "digital footprint" signals to search engines like Google that your business is legitimate and active, which is a crucial factor in boosting your local SEO and Google Maps rankings.
At LocalVantage, we know that tackling online directories can sometimes feel tedious. The good news? Claiming your spot on Yell is completely free and surprisingly simple.
Grab a cup of tea, and let’s walk through how to add your business to Yell step-by-step. In just 10 to 15 minutes, you'll have your profile up, running, and ready to attract new local customers.
Navigate to the Yell Free Listing Page
Starting your Yell journey is incredibly straightforward. While your customers will use the main Yell search engine to find you, as a business owner, you need to head to their dedicated business portal to claim your digital real estate.
1) Open your preferred web browser and go directly to https://www.yell.com/free-listing/
This will take you directly to Yells free listing form.
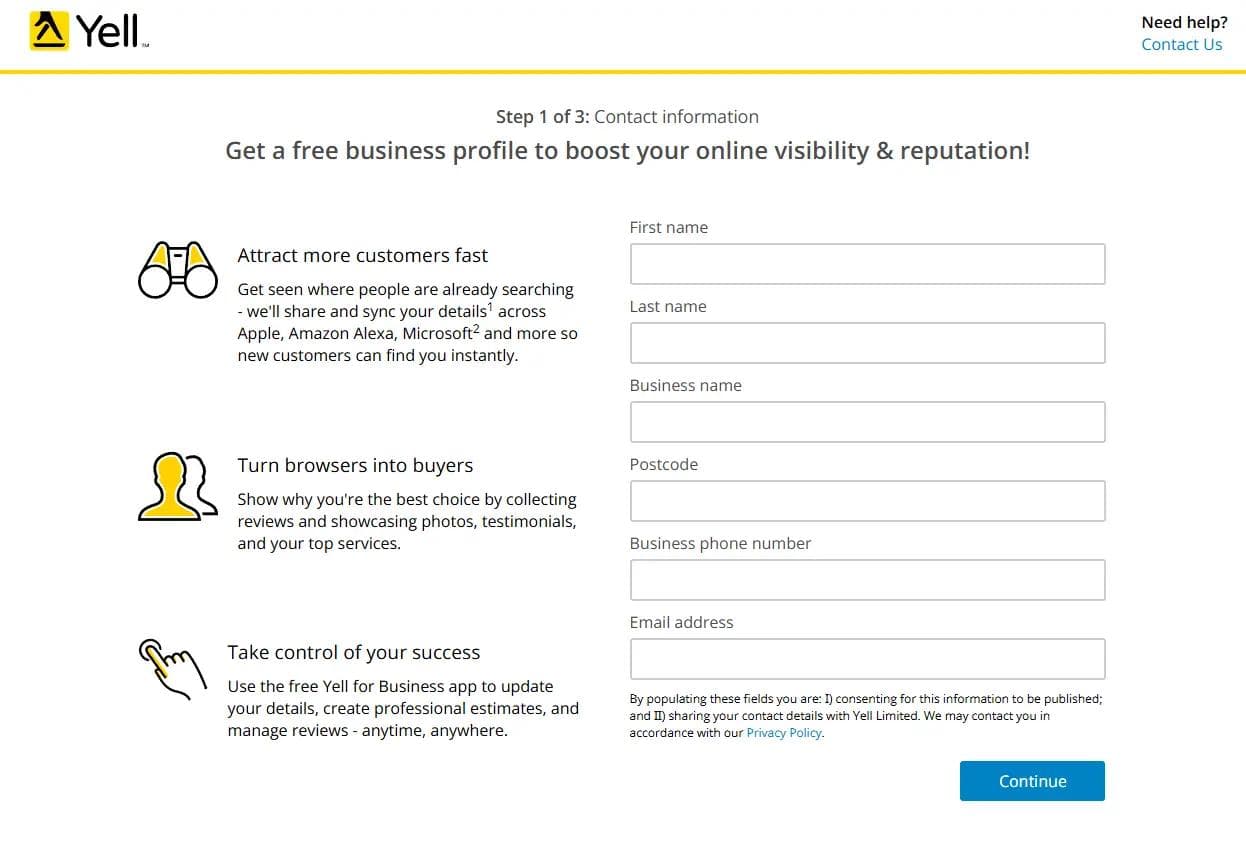
Enter Your Initial Business Details
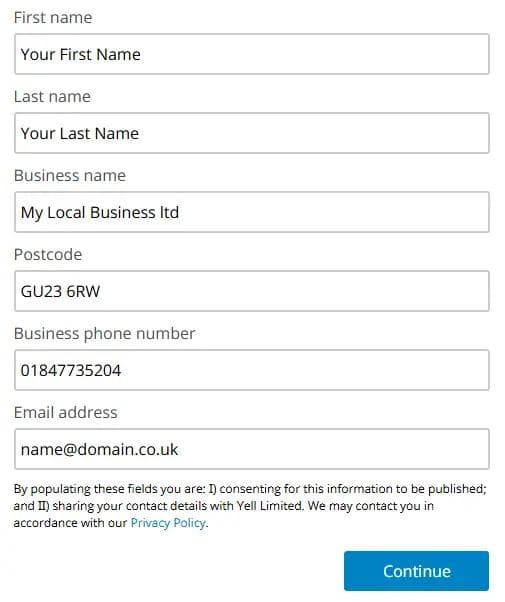
Now that you are on the setup page, Yell needs some basic information to start building your profile. It is crucial that the details you enter here exactly match the information on your website and other online directories. This consistency (known as your NAP—Name, Address, Phone number) is a major factor in local SEO.
- First and Last Name: Enter your own name as the account owner.
- Business Name: Use your official business name exactly as it appears on your storefront, website, or Google Business Profile. Avoid stuffing extra keywords here!
- Postcode: Enter the postcode where your business is located (or where you are registered if you are a service-area business).
- Business Phone Number: Provide your primary local contact number.
- Email Address: Use a professional email address ideally linked to your business domain. Ensure this is the same contact email you provide on your website and other business directory sites like your google business profile.
- Once everything is filled out and double-checked, click the blue Continue button.
Provide Your Address and Business Details
On the next screen, you will need to provide the exact location of your business and some deeper details about what you do. This section is vital for making sure your business shows up when local customers search for your specific services.
- Where is your business?: Fill out your full business address. Just like with your business name, ensure this is written exactly the same way it is on your website and your Google Business Profile (for example, if you use "St." everywhere else, don't use "Street" here).
- What does your business do?: This acts as your primary category. Start typing your main trade or profession (like "Plumber," "Hairdresser," or "Accountant") and select the most accurate option.
- Website: Although Yell marks this as Optional, do not skip it! Adding your website link drives direct traffic to your site and provides a valuable local backlink.
- Company Details: You'll be asked if you are a Limited company, how long you've been operating, your number of employees, and your annual turnover. Answer these to the best of your knowledge—Yell mostly uses this data to understand the size of businesses using their platform.
- Tick the box at the bottom to confirm you are authorized to advertise the business and agree to the terms, then hit the blue Continue button.

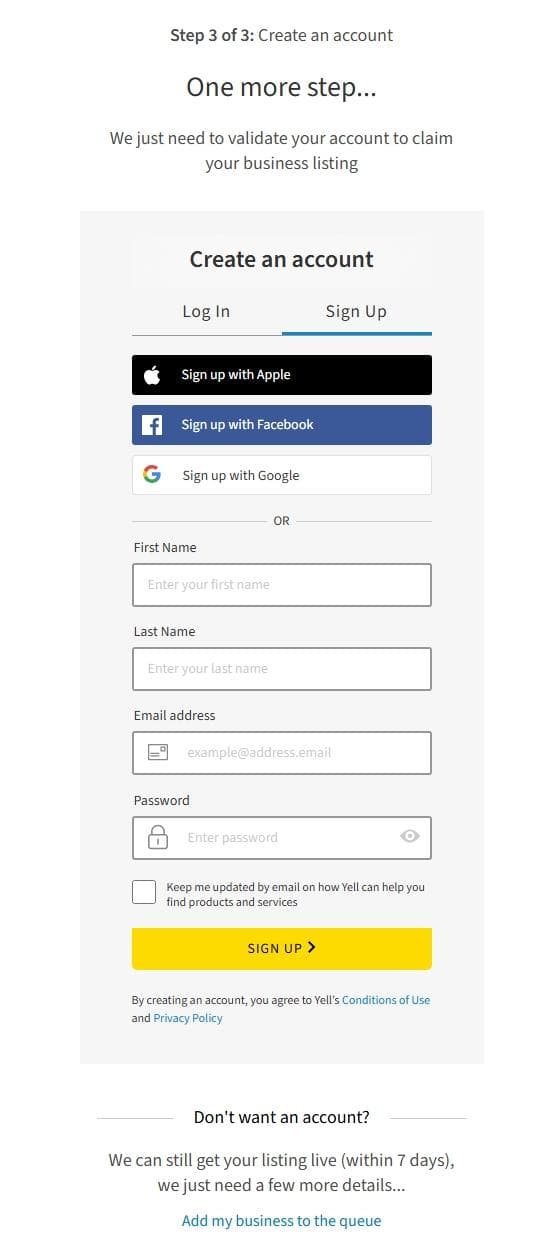
Create Your Account or Join the Queue
You are almost there! The final screen, asks you to validate your submission. Yell gives you two distinct paths to get your listing live: creating a free account or simply adding your business to their processing queue.
We highly recommend creating an account, but here is a breakdown of both options so you can choose what works best for you:
Option A: Create an Account (Highly Recommended) Creating an account gives you full control over your listing. It allows you to log back in later to update your opening hours, add photos, respond to customer reviews, and keep your profile fresh.
- You can use the quick sign-up buttons to link your Apple, Facebook, or Google account.
- Alternatively, fill in your First Name, Last Name, Email Address, and create a secure Password.
- Decide if you want to receive marketing emails from Yell (leave the box unchecked if you prefer not to), and click the yellow SIGN UP > button.
Option B: Add to the Queue If you are completely hands-off and just want the citation created without managing another dashboard, you can skip account creation.
- Scroll right to the bottom of the page and look for the section titled "Don't want an account?"
- Click the blue link that says Add my business to the queue.
- After doing this you will be asked a few more questions and then you should expect a phone call from Yell in the following days to verify your business.
- Note: As Yell mentions, choosing this route means it can take up to 7 days for your listing to go live, and you will not have an easy way to log in and make quick edits in the future.
Optimize Your New Yell Profile
Once your listing is live or your account is created, you need to add the details that will actually turn searchers into paying customers. You can manage your listing using either your desktop or your smartphone.
Option A: Via Your Online Yell Account (Desktop)
- Log in to your online Yell account.
- Click on Manage your profile page. (Note: If you have multiple business listings, you will be prompted to select which one to edit).
- Select the content you wish to update from the Profile summary section.
Option B: Via the Yell for Business App (Mobile)
- Download and launch the free Yell for Business app.
- Tap on Manage profile on the main home screen.
- Scroll down the Profile screen to add and edit your business details.
What Should You Add? Make sure to fill in as much information as possible in all the relevant fields. Focus on these key areas first:
- Your Opening Hours: Add your standard hours and remember to update them for bank holidays.
- High-Quality Photos: Upload your company logo, pictures of your team, your storefront, or completed work.
- Business Description: Write a short bio highlighting what makes your services unique, naturally including your target keywords (e.g., "emergency plumber in Camberley").
- Your Services: Spell out exactly what you offer so customers know immediately if you can help them.
LocalVantage Pro-Tip: Yell automatically attempts to sync your data with Apple Maps. However, if your business is registered at a residential property, it may not comply with Apple’s display criteria, and features like Apple Messaging might not activate immediately. Don't panic if this happens—Yell handles these rejections on your behalf and will activate it once resolved!