How to Add Your Business to Bing Places (Step-by-Step Guide)
In this guide
When it comes to local SEO, Google Business Profile usually steals the spotlight—but ignoring Bing Places for Business is a missed opportunity. Millions of people use Bing every day, especially since it's the default search engine for Windows PCs and powers voice searches for Cortana and Alexa.
Adding your business to Bing Places is completely free, surprisingly easy, and gives you an immediate edge over competitors who are only focusing on Google. Whether you are setting up a brand new listing or importing your existing details straight from Google, this guide will walk you through exactly how to claim your spot on Bing and start capturing that untapped local traffic.
Go to Bing Places and Log In
First things first, head over to the official Bing Places for Business website. Once you are on the homepage, locate and click the blue "Get Started" button.
Before you can add or claim your business, Bing will prompt you to log in. You do not necessarily need a Microsoft account to do this; Bing provides several flexible login options so you can use an account you already have:
- Google Account
- Microsoft Account (Outlook, Hotmail, Live, etc.)
- Facebook Account
- Work Account
Pro Tip: If you already have a Google Business Profile set up for your company, choose the Google Account login option and use the exact same email address. This will allow you to instantly sync and import your existing business data into Bing in the next step, saving you from having to type everything out manually!

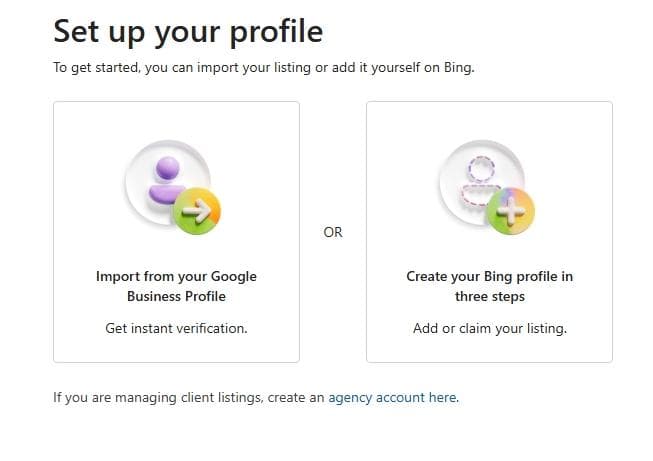
Choose How to Set Up Your Profile
Once you are logged in, Bing will present you with two main options for bringing your business onto their platform:
- Import from Google Business Profile: If you already have a verified listing on Google, Bing allows you to instantly sync your data over. This imports your business name, address, hours, photos, and categories.
- Claim or Add Your Business Manually: If you don't have a Google Business Profile, or simply prefer to start from scratch, you can use Bing's search tool to find your existing data or type in all of your business details manually.
⚠️ Crucial Note for Service Area Businesses (SABs): If you operate a Service Area Business (like a mobile mechanic, plumber, or cleaning service) and have your physical address hidden on your Google Business Profile, the Google import tool will not work correctly. Bing's import feature currently requires a visible physical address to pull the data over. If you are an SAB with a hidden address, you must choose to add your business manually. If you have a standard brick-and-mortar location, using the Google import feature is highly recommended as it saves a ton of time and ensures your information is perfectly consistent across search engines. If you need to go the manual route, don't worry—it is still a very straightforward process.
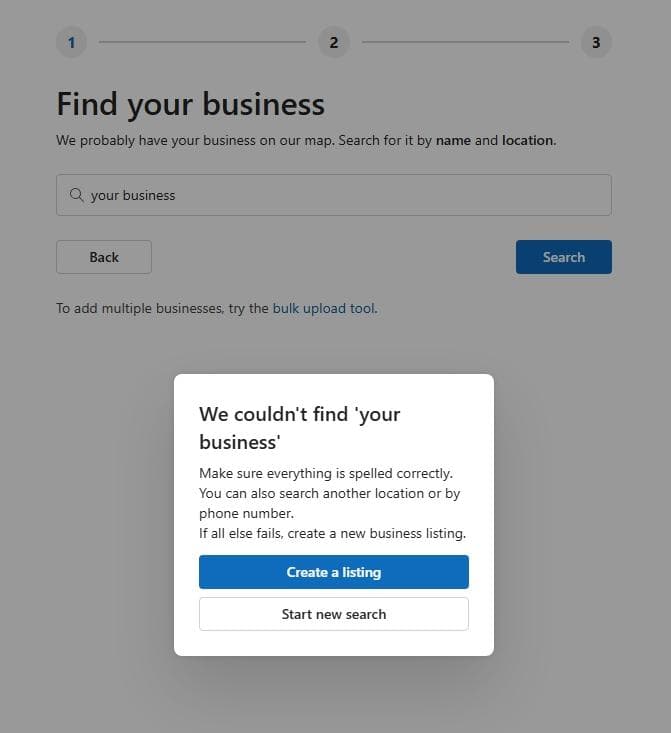
Search for Your Business
Since we are proceeding with the manual route, Bing first needs to check if an unclaimed listing for your business already exists in their database. This is a standard step to prevent duplicate listings from cluttering the search results.
- Enter your business name into the search field provided.
- Click the Search button.
If your business is brand new or simply hasn't been picked up by Bing's local data providers yet, it likely won't show up in the results. Instead, you will be presented with a popup message that reads:
"We couldn't find '[Your Business]'. Make sure everything is spelled correctly. You can also search another location or by phone number. If all else fails, create a new business listing."
When you see this message, don't worry—this is exactly what we expect for a new listing. Simply click the blue "Create a listing" button at the bottom of the popup to proceed with setting up your brand-new profile from scratch.
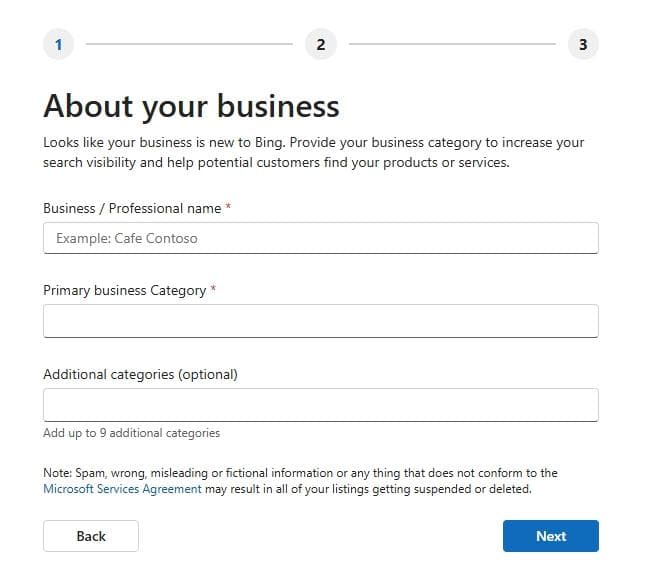
Fill Out Your "About Your Business" Details
Now that you are creating a new listing, Bing will ask you to provide the core details about your company. This section is vital for how you will appear in search results and helps Bing understand exactly what you do.
You will need to fill out the following fields:
- Business / Professional name: Enter the exact, real-world name of your business. Avoid stuffing extra keywords or location names in here (unless they are part of your legal name), as that violates Bing's guidelines and can result in your listing getting suspended.
- Primary business Category: This is the most important classification for your business. Start typing and choose the option from the dropdown that best describes your core operation (e.g., "Plumber," "Coffee Shop," "Real Estate Agency").
- Additional categories (optional): Bing allows you to add up to 9 extra categories. Take advantage of this if your business offers multiple distinct services. For example, if your primary category is "HVAC Contractor," your additional categories might be "Furnace Repair Service" and "Air Conditioning Contractor."
Once everything looks accurate, click the blue Next button to move on to the next section.
Enter Your Business Details (Address and Contact Info)
Next, you will need to provide the exact location and contact information for your business. This is a critical step for local SEO, so ensure the information you enter here matches exactly what is on your website and other online directories (this consistency is known as your NAP: Name, Address, Phone number).
Fill in the following fields:
- Address Information: Enter your complete street address (Address line 1), suite or apartment number if applicable (Address line 2), City, State, Postcode, and Country.
Note for Service Area Businesses (SABs): Even if you do not serve customers at your physical location (e.g., you work out of your home), you must enter your address here so Bing can verify your business. You will have the option to hide this address from the public map later in your dashboard settings.
- Phone number: Enter your primary local or toll-free business phone number.
- Website: Input your full website URL (make sure to include the
https://at the beginning). If you don't have a website, you can leave this blank, but having one is highly recommended for credibility.

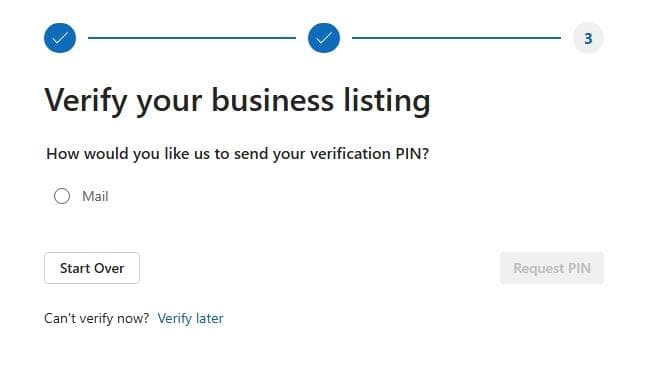
Verify Your Business Listing
The final step to getting your business live on Bing is verification. Bing needs to confirm that you actually represent the business at the address provided before they will display your listing to the public.
While the screenshot below only shows Mail as an option, it's important to note that Bing actually offers several verification methods, but the options you see depend on your business's existing online footprint. Because you are adding a brand-new business manually, Bing doesn't have enough data to trust the listing just yet, which is why they default to the most secure method: a physical postcard.
Here are the verification methods you might encounter:
- Mail (Postcard): This is the most common for new listings. Select the radio button next to "Mail," ensure the attention-to name is correct, and click Request PIN. Bing will mail a postcard to your business address containing a 5-digit PIN. It typically arrives within 5 to 6 business days.
- Phone / SMS: If Bing's data providers already have your business phone number on file from other directories, you might see an option to receive an automated call or text message with your PIN. This is instant!
- Email: If you are logged in with an email address that uses your business website's domain (e.g.,
[email protected]), Bing will often let you verify instantly via email. - Bing Webmaster Tools: If your website is verified in Bing Webmaster Tools using the same Microsoft account, your listing might verify automatically.
What to do next: Choose the most convenient verification method available to you. If you select Mail, keep an eye out for the postcard. Once you receive your PIN, simply log back into your Bing Places dashboard, click on your pending listing, and enter the code to make your profile live!
(Note: If you aren't ready to verify right now, you can click the "Verify later" link at the bottom, but remember that your listing will not appear in Bing search results until the verification process is complete.)